


How to Effectively Use a Bicycle Wall Hanger for Stylish and Space-Saving Storage
Understanding the Benefits of a Bicycle Wall Hanger
For cycling enthusiasts and casual riders alike, maintaining a bicycle can often pose several challenges, especially when it comes to storage. A Bicycle wall hanger emerges as an innovative solution to transform how you store your bike. By utilizing wall space effectively, these hangers not only keep your bicycle safe and secure but also help in optimizing limited living areas. Let’s delve deeper into the multifaceted benefits of bicycle wall hangers for today’s urban cyclist.
Space Optimization for Small Areas
In many urban settings, space is a premium commodity. For individuals living in apartments or homes with limited square footage, finding an optimal storage solution for a bicycle can be daunting. Traditional bike storage options, such as floor stands or freestanding racks, consume valuable floor space. A Bicycle wall hanger allows homeowners and renters to reclaim floor space by utilizing vertical walls.
By hanging your bike on the wall, you not only open up your floor area for other uses, but you also create a visually appealing display. This vertical storage solution can fit into various home aesthetics, serving as both a storage method and a design element. Whether you choose to mount bikes horizontally or vertically, the wall hanger can adapt to your spatial and aesthetic needs.
Keeping Your Bike Safe
Securing your bike is a primary concern for many cyclists, especially in urban environments where theft can be prevalent. A Bicycle wall hanger provides a designated spot for your bike, making it harder for opportunistic thieves to access it. With the bike stored high off the ground and out of reach, you significantly reduce the risk of theft.
Besides theft prevention, wall hangers also prevent damage that might occur when bikes are left unattended on the ground. They keep your bike protected from accidental knocks, scrapes, or falls, preserving its condition over time. A dedicated wall-mounted solution ensures your bike’s longevity while maintaining its aesthetic appeal.
Enhancing Home Decor with a Bicycle Wall Hanger
Gone are the days when bikes were merely utilitarian objects. Today’s bicycle designs are often works of art, and displaying them on a wall can enhance the look of your home. A thoughtfully chosen Bicycle wall hanger will complement your interior design, adding an element of style and personality to your space.
Designs range from sleek and modern to rustic and vintage, allowing you to select a wall hanger that resonates with your home decor. Displaying your bike in this way can also serve as an inspiration for others and highlight your passion for cycling.
Types of Bicycle Wall Hangers to Consider
Vertical and Horizontal Options
When selecting a bicycle wall hanger, one of the first decisions to make is between vertical and horizontal mounting. Each option serves different space and aesthetic preferences. Vertical hangers allow bikes to be stored upright, ideal for narrow spaces. They often occupy minimal wall space and allow for easy access to the bike when needed.
Conversely, horizontal mounting positions the bike parallel to the ground. This option can be more visually striking, particularly if you wish to showcase your bike. Additionally, it can accommodate bikes with varying dimensions and may even allow you to hang multiple bikes in a shared space.
Adjustable and Fixed Mounts
Another factor in choosing the right bicycle wall hanger is the ability to adjust the mounts. Adjustable mounts can be altered to fit bikes of different sizes and styles, providing flexibility, especially in households with multiple bicycles. This feature is particularly useful in accommodating various bike types, whether road, mountain, or hybrid.
Fixed mounts, on the other hand, can provide a sturdier hold and are often preferred for their simplicity and ease of installation. This choice may be beneficial for those who have a specific bike they always use and don’t require frequent adjustments.
Material and Design Variations
Bicycle wall hangers come in an array of materials, including wood, metal, and composite materials. Wooden mounts can add a touch of warmth and natural beauty to your space, while metal options provide durability and a contemporary feel.
When considering design variations, look for features such as rubber padding or cradling mechanisms that protect the bike’s frame. The design should ensure that the bike is held securely while preventing scratches and damages. Always assess which material and design best fits your lifestyle and home environment.
How to Choose the Right Bicycle Wall Hanger for Your Bike
Weight Capacity Considerations
Before purchasing a bicycle wall hanger, it’s essential to consider the weight capacity of the mount. Each bike has its own weight category, depending on its frame, components, and any additional accessories. A mount that cannot support the weight of your bike may lead to accidents or damages.
Ensure that the wall hanger meets or exceeds the weight of your bicycle when loaded with all accessories. Most manufacturers will provide specific weight limits for their products, which should be strictly followed for optimal safety.
Compatibility with Various Bike Types
Not all bicycle wall hangers are universally compatible. It’s crucial to assess whether the hanger can accommodate your bike type. Road bikes, mountain bikes, and hybrid bikes have various geometries and frame sizes. Therefore, ensure that the chosen wall hanger has the necessary features to hold your bike securely, regardless of its style.
Some mounts, for instance, may work better with bikes that have thinner frames, while others are designed to securely grip thicker frames. Thoroughly review the specifications before making a purchase.
Installation Ease and Location
The installation process of a bicycle wall hanger can vary between products. Some mounts require only simple tools and can be installed in minutes, while others may necessitate more time and precision. Evaluate your DIY skills as well as the installation requirements before making a choice.
Moreover, consider where you would like to install the wall hanger. Locations such as garages, living rooms, or hallways each offer distinctive advantages and should be chosen based on accessibility and aesthetics. Make sure that the area has enough wall space and consider factors such as lighting and ease of access for your bike usage routine.
Installation Guide for Your Bicycle Wall Hanger
Tools and Materials Needed
Before beginning the installation of your bicycle wall hanger, gather the necessary tools and materials. Generally, you will need:
- A drill
- Drill bits appropriate for wall material (wood, drywall, masonry)
- Screws and anchors (usually included with the hanger)
- A level
- A measuring tape
- A pencil for marking positions
- Safety gear such as goggles and gloves
Step-by-step Installation Process
Installing your bicycle wall hanger should be a straightforward process. Here’s a step-by-step guide:
- Choose the Location: Select an appropriate wall where you want to mount the bicycle hanger, ensuring it’s within reach and has adequate space around it.
- Measure and Mark: Use the measuring tape to find the ideal height for the hanger. Mark the positions of the mounting holes with a pencil.
- Drill Holes: Using the drill, create holes at your marked positions. If using anchors, ensure the holes are sized accordingly.
- Attach the Hanger: Align the wall hanger with the drilled holes and secure it using screws. Ensure it’s level as you tighten the screws.
- Test the Installation: Before placing your bike on the hanger, gently tug to ensure it’s securely mounted.
Following these steps will ensure a safe and efficient installation process for your hanger.
Safety Tips During Installation
Safety should be a priority during installation. Here are some essential safety tips to keep in mind:
- Always wear safety goggles when drilling to protect your eyes from debris.
- Ensure your work area is clear of unnecessary clutter to avoid accidents.
- If you are unsure about drilling into a specific material, consult a knowledgeable professional for advice.
- Check for any electrical wiring or plumbing in the wall before drilling.
Maintenance Tips for Your Bicycle Wall Hanger
Regular Checks and Adjustments
Once your bicycle wall hanger is installed, regular maintenance checks are advised to ensure it remains secure and effective. Periodically inspect the screws for tightness and check the integrity of any anchors utilized. As with any installation, wear and tear can occur, so diligent mechanical assessments are necessary.
If the hanger seems loose or unstable, immediately address the issue, as this could pose safety risks. Keeping your bicycle wall hanger in optimal condition means you can trust its capabilities to reliably hold your bike.
Cleansing and Caring for Your Hanger
Over time, dust and grime can accumulate on your bicycle wall hanger, especially when exposed to bike tires or garage environments. Regular cleaning will ensure both aesthetic appeal and function. Use a damp cloth with mild detergent to wipe down the hanger, removing any dust, dirt, or tire marks. Avoid abrasive materials that could scratch the surfaces.
Additionally, periodically check for signs of corrosion, especially if your hanger is made from metal, and address any issues promptly to prevent deterioration.
When to Replace Your Hanger
Eventually, even the best-maintained bicycle wall hangers may need to be replaced due to wear and tear. Signs indicating it’s time for a replacement include:
- Visible rust or corrosion
- Loose fitting or failure of screws
- Cracks in the materials
- Changes in structural integrity that suggest limits have been exceeded
Being proactive with these inspections not only preserves your bike but also promotes safety, ensuring your bicycle is always stored securely and effectively.

Finding Reliable Local Roofers Near Me: Your Comprehensive Guide to Quality Roofing Services
Understanding the Importance of Hiring Local Roofers
When it comes to roofing services, hiring local roofers near me can offer numerous advantages that extend beyond just convenience. While there might be a plethora of choices available, opting for local talent has significant benefits that can greatly impact the quality and longevity of your roofing project. Local roofers understand the unique weather patterns, local regulations, and the needs of the community, making them prime candidates for your roofing concerns.
Why Choose Local Roofers Near Me?
Choosing local roofers is often key to superior service. One of the foremost reasons is that local roofers typically have established reputations within their community. Word of mouth can significantly affect their business, and they are likely to maintain high standards to build and protect their image. Additionally, these contractors generally have better accessibility for follow-ups, repairs, and maintenance after the completion of the project.
Benefits of Local Knowledge and Expertise
Local roofers possess invaluable insights about the specific geographical area. This includes an understanding of the climate, local building regulations, and roofing materials that best stand up to regional weather. For example, in a region prone to heavy rain, a local roofer will know the importance of proper drainage systems to prevent water damage. This kind of expertise ensures that roofs are built or repaired adequately, increasing their longevity and reducing the risk of future issues.
Building Relationships with the Community
Hiring local roofers can foster a sense of community and trust. These businesses often invest in their local area by supporting schools, participating in local charity events, and employing residents. Such involvement not only fosters a spirit of goodwill but also further encourages local contractors to strive for high-quality workmanship, knowing their reputation is tied to the community’s perception of their service.
Key Services Offered by Local Roofers
Types of Roofing Services Available
Local roofers offer a wide variety of services that can meet diverse needs. These may include installations of different roofing materials such as asphalt shingles, metal, tiles, and flat roofs. Each material has its pros and cons, and local tradesmen are able to guide you based on both functionality and aesthetic preferences.
In addition to installations, many local roofers provide services such as roof repairs, which can range from fixing leaks to replacing shingles damaged by storms or wear. They also frequently offer gutter installation and repair, skylight installation, and roof coatings that can enhance energy efficiency.
Commercial vs Residential Roofing Needs
Understanding the differences between commercial and residential roofing needs is essential. Commercial roofs typically involve larger-scale projects and may use different materials that are durable and capable of supporting heavy equipment. Local roofers are well-equipped to work on various property types, ensuring that they meet safety and durability standards.
Residential roofing, on the other hand, places a greater emphasis on aesthetics and design, which often requires collaboration to meet the homeowner’s vision. Local roofers can provide personalized consultations to help homeowners make the best decisions for their roofs.
Inspection and Maintenance Services
Regular inspections and maintenance are essential for any roofing system’s longevity. Local roofers often provide seasonal inspections, helping to identify potential issues before they become significant problems. These inspections typically include checking for wear and tear, examining flashing, gutters, and overall structural integrity.
Furthermore, many local contractors offer maintenance services that can prolong the life of your roof by addressing small issues promptly, thereby avoiding more extensive and expensive repairs in the future.
How to Evaluate Local Roofers
Checking Licenses and Insurance
Before hiring any roofer, it’s vital to verify their licenses and insurance. A reputable roofing company will hold the appropriate state licenses and have liability insurance. This protects both parties during any eventuality, safeguarding you from liability in case of accidents while work is being performed. Always ask for documentation and ensure that it is up to date.
Reading Reviews and Testimonials
Reviews and testimonials from previous clients can provide insight into a roofer’s quality of work and customer service. Pay attention to common themes in reviews regarding punctuality, workmanship, and after-service care. Websites like Angie’s List and Yelp can be excellent platforms for gauging local roofers’ reputations.
Moreover, don’t hesitate to ask the contractor for references, which can help you feel more confident in your selection.
Requesting Quotes and Comparing Prices
When it comes to roofing, price can vary significantly from one local contractor to another. A reliable approach is to obtain quotes from multiple companies. Ensure that each quote is itemized, as this transparency helps you understand exactly what you’re paying for and facilitates comparisons.
While budget considerations are critical, make sure to weigh the value of service quality against the cost. The cheapest option may not always provide the best long-term results.
Common Roofing Issues and Solutions
Identifying Signs of Roof Damage
Knowing how to identify signs of roof damage can save homeowners significant costs in repairs. Common indicators include missing shingles, sagging roofs, water stains on ceilings and walls, and frequent leaks. If you suspect damage, contact a professional for an inspection as soon as possible.
Understanding Repair vs Replacement Decisions
Deciding whether to repair or replace your roof can be a challenging dilemma. Factors to consider include the age of the roof, the extent of the damage, and the overall condition of the roof structure. Generally, if the roof is nearing the end of its lifespan or if the damage is extensive, replacement might be more cost-effective in the long run.
On the contrary, minor issues, such as localized leaks or missing shingles, may only require repairs. Consult with your local roofer to discuss the best course of action based on a thorough inspection.
Importance of Timely Maintenance
Timely maintenance can help avert costly repairs down the road. Simple actions, such as clearing gutters, trimming overhanging branches, and replacing worn-out shingles, can significantly extend the life of your roof. Establish a routine maintenance schedule with your local roofer to protect your investment and to uphold the integrity of your home.
Your Next Steps for Hiring Local Roofers Near Me
Preparing for Consultations
Once you’ve narrowed down your list of local roofers, it’s time to prepare for consultations. Compile a list of questions about services, pricing structures, warranties, and timelines for each company. Being informed will enable you to make better decisions and identify the contractor that best aligns with your needs.
Questions to Ask Your Roofer
During consultations, be sure to ask pertinent questions such as:
- How long have you been in business?
- Can you provide references and examples of previous work?
- What warranties are offered for both labor and materials?
- How do you handle unexpected issues during the project?
- What payment plans do you accept?
Finalizing Contracts and Agreements
Before the project begins, ensure that you review and understand all contractual agreements. These documents should clearly outline the scope of work, pricing, payment terms, warranties, and timelines. Having everything in writing protects both you and the contractor should any disputes arise.
Once you feel confident about the details, sign the contract and schedule your roofing project. With the right local roofer by your side, you can enjoy peace of mind and a beautifully maintained roof for many years to come.

Enhancing Space with Movable Glass Partitions: Design Flexibility and Functionality
Understanding Movable Glass Partitions
Definition and Overview
Movable glass partitions are versatile, flexible solutions for modern spaces that encourage openness and collaboration while maintaining functionality. These partitions are designed to create adaptable spaces by allowing users to easily configure the layout of an area according to their specific needs. Typically composed of transparent panels, they foster a sense of connection while providing the ability to divide spaces when necessary. Effective in a variety of environments—ranging from corporate offices and conference rooms to residential homes and retail spaces—movable glass partitions enhance aesthetic appeal while optimizing room functionality. For a detailed exploration into these innovative solutions, consider investigating movable glass partitions.
Types of Movable Glass Partitions
Movable glass partitions can be segmented into various types based on their structure and functionality. Understanding each type is crucial to selecting the right solution for your space:
- Sliding Glass Partitions: These panels slide along tracks on the ceiling or floor, allowing for seamless transitions between open and closed spaces. They are often used in restaurants and office environments to create private meeting areas.
- Folding Glass Partitions: Similar to accordion doors, folding glass partitions can be moved aside to create large, open areas when needed. They are ideal for spaces that require frequent transformations, such as banquet halls or conference centers.
- Stacking Glass Partitions: These systems have multiple panels that can be stacked together when opened. Highly functional, they are often used in dynamic environments, providing maximum space flexibility.
- Frameless Glass Partitions: These sleek partitions consist of glass panels without visible frames, offering a minimalist aesthetic. They are commonly utilized in contemporary office designs and upscale residential settings.
- Acoustic Glass Partitions: Designed to provide sound insulation, acoustic glass partitions are ideal for spaces where privacy is paramount, such as law firms or healthcare facilities.
Advantages Over Traditional Dividers
Movable glass partitions offer numerous benefits over traditional wall dividers, making them an attractive solution for many environments:
- Flexibility: The ability to modify space configurations easily ensures that environments can adapt to changing needs.
- Aesthetic Appeal: Glass provides an elegant and modern look, enhancing the visual quality of a space and allowing natural light to flow throughout.
- Improved Communication: Visibility through glass partitions encourages collaboration and communication among employees or residents.
- Space Optimization: Movable partitions maximize the usage of available space, allowing for efficient layout changes without permanent construction.
- Sound Control: Many systems come equipped with acoustic features, providing sound insulation that is beneficial in office and hospitality settings.
- Energy Efficiency: Glass walls can be designed with energy-efficient materials to help with insulation and temperature regulation.
Applications of Movable Glass Partitions
Corporate Spaces
In corporate environments, movable glass partitions can be used to redesign office layouts, create breakout rooms, or establish temporary meeting spaces. This flexibility allows businesses to adapt their environments to various situations, from hosting team meetings to client presentations. Modern glass partitions often come equipped with soundproofing materials to ensure privacy during conversations, making them suitable for high-profile negotiations.
Residential Uses
Movable glass partitions are also gaining popularity in residential settings. Homeowners can use them to create flexible living spaces, such as home offices, playrooms, or dining areas that can be closed off or opened up as needed. The stylish appearance of glass enhances home aesthetics while acting as a functional space division. With the ability to introduce light into areas that might otherwise feel closed off, these partitions can transform the ambiance of a home.
Hospitality and Retail Environments
The hospitality industry benefits significantly from movable glass partitions, offering venues the ability to adjust room sizes for events. Restaurants and hotels can create private dining experiences or open up facilities for larger gatherings. Similarly, retail spaces can use glass partitions for changing room areas, displays, or separate product offerings, retaining an open feel that encourages customer exploration.
Key Features to Consider
Sound Control and Privacy Options
When selecting movable glass partitions, sound control features are paramount, particularly in environments where privacy is crucial. Acoustic glass partitions rated for sound transmission class (STC) can provide adequate sound insulation, making discussions more confidential. Depending on the intended use, it’s important to consider the specific STC rating required to ensure an appropriate level of sound control.
Energy Efficiency and Insulation
Energy efficiency is also a key feature to consider, particularly in terms of insulation and solar gain control. Modern movable glass partitions can be fitted with low-emissivity (Low-E) coatings that reduce heat transfer while allowing natural light. This can lead to improved energy performance of the overall building.
Design Aesthetics
Design plays an integral role in the selection of movable glass partitions. Whether opting for frameless styles that promote a clean, minimalist look or decorative options with aesthetic framing, the choice should align with the overall design vision of the space. Customizations should take into account branding, colors, and materials to create cohesive designs that resonate with the surrounding architecture and interior design.
Installation and Maintenance
Professional Installation vs. DIY
While many may consider a DIY approach for movable glass partitions, professional installation is often recommended. Proper installation ensures that the systems function smoothly and safely. Professionals have access to specialized tools and expertise that can prevent common pitfalls, such as misalignment or inadequate soundproofing. If hiring a professional is not feasible, it is vital to follow manufacturer guidelines meticulously for any DIY endeavors.
Regular Maintenance Tips
To ensure that movable glass partitions maintain their functionality and appearance, regular maintenance is essential:
- Cleaning: Use appropriate glass cleaning products to avoid streaking, and avoid abrasive materials that could scratch the surface.
- Inspection: Regularly check mechanisms and tracks for wear, and ensure moving parts are lubricated to prevent sticking or jamming.
- Adjustments: Periodically assess the alignment and operation of panels to ensure optimal functionality and a seamless user experience.
Cost Considerations
The cost of movable glass partitions can vary widely based on factors such as quality, size, type, and installation costs. While higher-quality options may carry a higher price tag, they often yield better durability and aesthetics in the long run. Additionally, accounting for long-term energy savings and improved space utilization can help justify the initial investments.
Future Trends in Movable Glass Partitions
Innovative Technologies
The future of movable glass partitions is bright, with new technologies constantly emerging. Smart glass technology, for instance, allows users to adjust the opacity of glass on demand, providing privacy when needed while maintaining openness otherwise. Integrations with automated systems for lighting and climate control are also making headway, allowing for fully customizable environments.
Sustainability Practices
As environmental concerns grow, manufacturers are increasingly focusing on sustainability in the production of movable glass partitions. This includes the use of recycled materials, environmentally-friendly coatings, and energy-efficient manufacturing processes. Consumers are encouraged to inquire about sustainability certifications and practices when selecting products for their spaces.
User-Centric Designs
Designs that prioritize user experience will continue to be a major trend in the development of movable glass partitions. This includes features that enhance accessibility, ease of use, and adaptability to diverse space needs. Engaging end-users in the design process can help create solutions that not only meet functional needs but also align with users’ comfort and workflow preferences.

How to Build Your Own Pool: A Comprehensive Guide for Custom Backyard Designs
Understanding the Basics of Building Your Own Pool
Building a pool in your backyard can enhance both the value of your home and your family’s outdoor enjoyment. If you’re ready to jump in, you’ll need to navigate through several important stages of the process. Whether you envision a sleek modern design or a more traditional oasis, understanding the basics will help lay the ground for a successful project. This guide aims to make the journey easier by helping you build your own pool effectively while managing costs and ensuring a beautiful, functional space.
Choosing the Right Pool Type for Your Needs
The first step in constructing your pool is determining the type that best suits your lifestyle, preferences, and space. The most common types of pools include:
- In-ground Pools: Typically made from concrete, fiberglass, or vinyl, these pools offer a permanent solution tailored to your design vision.
- Above-ground Pools: More affordable and easier to install, these are useful for temporary or seasonal use, though they come with less aesthetic integration.
- Infinity Pools: Aesthetic marvels that offer a stunning visual effect by blending seamlessly with the horizon, these pools require careful planning and installation.
- Lap Pools: Perfect for those who swim for exercise, these narrow and long pools prioritize functionality while also providing a chic look.
Evaluate your space and budget to identify which type aligns with your needs. Consider factors such as maintenance, usability, and design integration into your existing landscape.
Essential Planning and Permitting Steps
Once you’ve selected the pool type, planning becomes crucial. Before breaking ground, you’ll need to:
- Check Local Regulations: Different cities and states have specific regulations regarding pool installations, which may include permits, zoning requirements, and property setbacks.
- Consult Professionals: Engage pool contractors and landscape architects early on, as their expertise will guide you through necessary regulations and help in drafting a blueprint.
- Create a Timeline: A detailed schedule helps manage the construction phases, ensuring a smooth process from excavation to finishing touches.
Proper planning minimizes disruptions and helps you stay on track with your budget and timeline.
Budgeting for Your Dream Pool Project
Cost estimation is an indispensable part of the pool-building journey. The total cost of a pool can vary widely based on materials, features, and labor. Consider these essential components:
- Installation Costs: This includes excavation, construction, and installation of the pool structure and systems.
- Pool Equipment: Filtration systems, pumps, heaters, and lighting are important components that will add to your initial and long-term costs.
- Landscaping and Decking: Enhancing your pool area with beautiful landscaping and durable decking will create an inviting atmosphere.
- Maintenance Costs: Factor in ongoing expenses, such as chemicals, cleaning, and repairs.
Creating a detailed budget will help anticipate financial demands and avoid surprise expenses during the construction process.
Designing Your Ideal Pool Environment
Once you have established your budget and have a clear plan in place, it’s time to focus on the design of your pool environment. This is where you can customize the aesthetics while ensuring functionality.
Incorporating Landscaping and Hardscaping
For a cohesive outdoor space, integrating landscaping and hardscaping around your pool is vital. Elements to consider include:
- Plants: Select native plants that complement the design and are suited to your climate, ensuring easy maintenance and sustainability.
- Patios and Walkways: Choose materials like pavers, stone, or concrete for durable surfaces that enhance your pool’s aesthetics and allow for safe movement.
- Outdoor Features: Consider adding features such as waterfalls, fountains, or fire pits to create an inviting ambiance and improve the overall experience.
Landscaping and hardscaping should also reflect your personal style and harmonize with the surrounding environment for a natural look.
Selecting Pool Features and Additions
Once the main structure is in place, think about additional features that can elevate your pool experience further:
- Lighting: LED lights, both underwater and around the pool area, not only enhance visual appeal but also contribute to safety during nighttime swimming.
- Heating Systems: Consider integrating a heating option for year-round use; gas, electric, and solar heaters are popular choices.
- Water Features: Waterslides, fountains, or spa jets can add fun and aesthetic value while providing a unique character to your pool.
- Automation Systems: Smart technology can make managing pool operations convenient, including cleaning schedules, temperature control, and lighting settings.
Selecting the right features depends on your lifestyle, budget, and how you plan to use your pool.
Creating a Cohesive Outdoor Space
A successful pool area is an extension of your home. A well-designed outdoor space should incorporate elements of comfort and relaxation:
- Outdoor Furniture: Invest in quality loungers, chairs, and tables that can withstand the elements while providing comfort for everyone.
- Shade Structures: Installing umbrellas, pergolas, or canopies will ensure protection from the sun and create a cozy retreat.
- Fire Pit Areas: A fire pit can serve as a gathering spot, creating an inviting ambiance for evening swims or relaxing nights under the stars.
By integrating these elements into your pool area, you create a harmonious environment that enhances outdoor enjoyment.
Construction Steps for Your Custom Pool
With your design ready and plans finalized, the construction phase begins. Understanding the primary steps in this process will help ensure that everything goes according to schedule.
Site Preparation and Excavation
Site preparation is vital to successful pool construction. This phase includes:
- Clearing the Area: Remove any debris, plants, or structures that could interfere with the construction.
- Excavation: The site is dug, often involving machinery, to create the correct shape and depth for your pool.
- Compacting Soil: Ensuring that the soil is stable will prevent future shifting and settling of the pool.
Proper excavation sets a solid foundation for the installation of the pool structure.
Building the Structure: Materials and Techniques
Depending on the type of pool you’re building, various materials and construction methods will be involved:
- Concrete Pools: Require steel rebar skeletons that are sprayed with gunite, followed by a plaster finish.
- Fiberglass Pools: Prefabricated structures that are dropped into the excavated space, offering faster installation.
- Vinyl Pools: Customized liners fitted into a steel or polymer frame, providing a variety of design options.
Each option has its pros and cons in terms of durability, cost, and maintenance; selecting the right one for your needs is crucial.
Installing Pool Systems: Filtration and Lighting
Efficient pool operation requires various system installations. Key components include:
- Filtration System: These systems will maintain clean water by removing debris and contaminants, consisting of filters, pumps, and skimmers.
- Electrical Systems: Includes planning for pool lights and any automated systems you’d like to integrate into your pool.
- Water Heaters: Connect these to provide a comfortable swimming environment regardless of the outdoor temperature.
Proper installations are crucial for efficient pool functioning and user satisfaction.
Safety Measures When Building Your Own Pool
Safety cannot be overlooked in pool construction. Ensuring a secure environment is paramount, especially if children or pets will be around.
Installing Fencing and Safety Covers
One of the first safety measures to consider is enclosing your pool area:
- Fencing: Install a barrier at least four feet high with self-latching gates to prevent unauthorized access.
- Safety Covers: During the off-season, covers can protect the pool and prevent accidental falls.
These features are vital in keeping your pool safe and compliant with regulations.
Understanding Local Safety Regulations
Each jurisdiction has different regulations concerning pool safety:
- Local Codes: Familiarize yourself with your area’s building codes to meet all requirements upon approval.
- Inspections: Ensure that licensed professionals conduct necessary inspections during construction and before your pool opens.
Building according to regulations not only protects users but potentially saves you from hefty fines or legal complications.
Maintaining a Safe Environment for Everyone
Regular maintenance and safety checks help maintain a safe swimming environment:
- Supervision: Always supervise children and inexperienced swimmers around the pool area.
- Emergency Equipment: Keep lifesaving devices, like flotation aids and life rings, easily accessible.
- Education: Teach family members about pool safety, which can include swimming lessons and water safety courses.
A proactive approach to safety creates a fun and secure atmosphere for enjoying your new pool.
Maintenance and Care for Your New Pool
With your dream pool completed, maintaining it becomes essential for longevity and user enjoyment. Routine maintenance helps you avoid costly repairs and ensures clean, inviting water.
Routine Cleaning and Chemical Balancing
Your pool’s water quality requires regular attention:
- Skimming and Vacuuming: Regularly remove debris on the surface and maintain the pool’s floor condition.
- Chemical Testing: Test water chemistry weekly to maintain appropriate pH, chlorine, and alkalinity levels for safe swimming.
- Filter Cleaning: Keep the filtration system functioning optimally by cleaning or replacing filters as needed.
Consistency in these tasks ensures an enjoyable swimming experience while safeguarding health.
Seasonal Preparation and Closing Procedures
Proper care throughout the seasons protects your pool:
- Winterization: If you live in a colder climate, properly winterize your pool to prevent damage from freezing temperatures.
- Spring Opening: Before opening your pool for the summer, execute a thorough cleaning and equipment check.
Each seasonal transition requires specific steps to ensure your pool remains in top condition year-round.
Long-term Maintenance Tips for Longevity
To ensure a long lifespan for your new pool, it’s wise to follow best practices:
- Routine Inspections: Schedule professional pool inspections to address concerns before they escalate into larger issues.
- Equipment Upgrades: Stay updated with the latest technology and consider energy-efficient solutions for filtration and heating.
- Regularly Update Safety Measures: As the pool ages, review and update safety features to align with current standards.
A commitment to maintenance will enhance both the functionality and enjoyment of your pool for years to come.
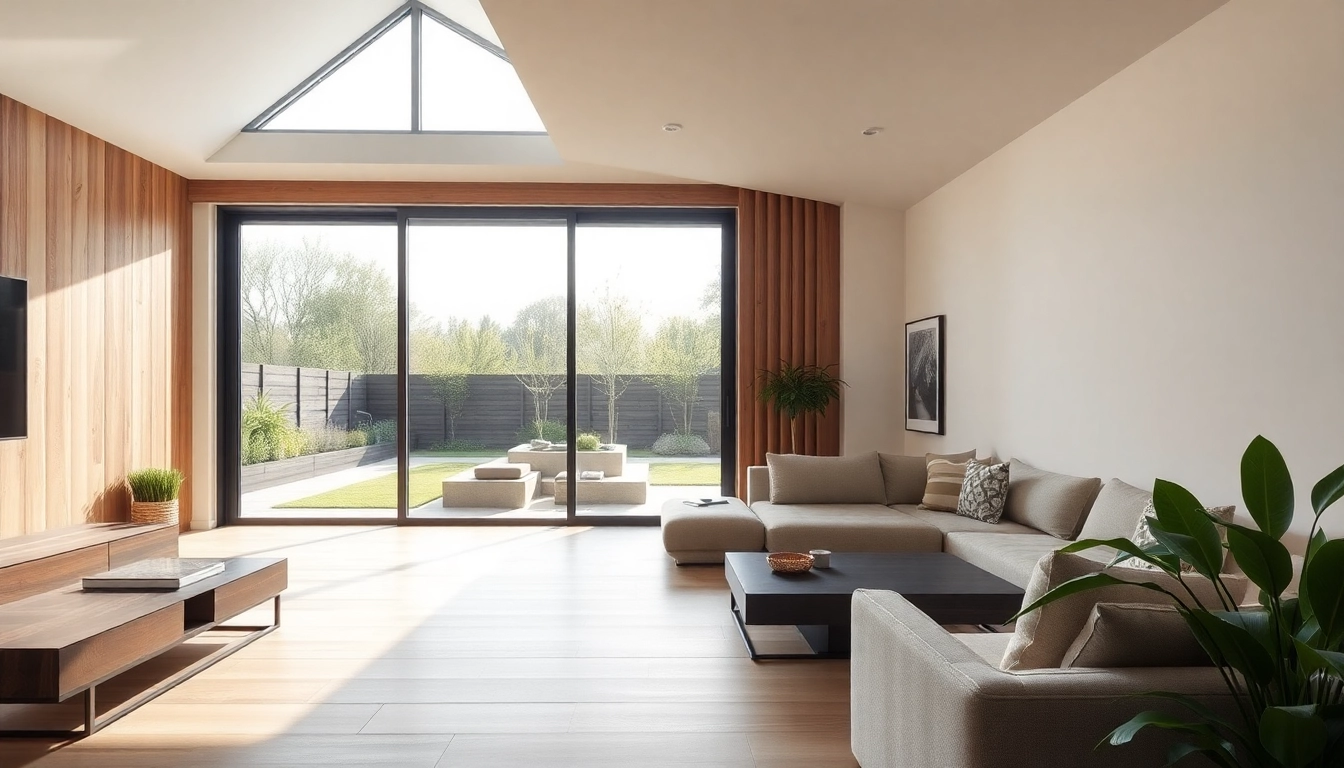
Enhancing Your Home: Creative Ideas for Rear Extensions
Understanding Rear Extensions
What Are Rear Extensions?
Rear extensions are structural modifications that extend from the back of a property. This type of home improvement is popular among homeowners looking to maximize their living space without the hassle of moving. Designed to enhance both functionality and aesthetic appeal, rear extensions can transform a simple house into a more spacious and modern living environment. Often, these extensions come in the form of additional rooms, such as kitchens, living areas, or even dining rooms, providing homeowners with more options in how they utilize their space. Depending on the existing layout of the house, a rear extension can significantly enhance natural light flow and ventilation, which are essential aspects of creating a pleasant home atmosphere.
Benefits of Adding a Rear Extension
There are multiple advantages to adding a rear extension to your home:
- Increased Space: One of the primary motivations for a rear extension is to add extra square footage. Whether it’s creating an expanded kitchen, a larger living room, or an additional dining space, a rear extension can significantly enhance your home’s usability.
- Enhanced Property Value: A well-designed rear extension can boost your property’s market value, making it a worthwhile investment when you decide to sell. Real estate often appreciates in value based on livable space, and a rear extension can provide a considerable return on investment.
- Better Family Living: A rear extension can offer a more functional layout for families, providing designated areas for cooking, dining, and relaxation, which may be especially beneficial in smaller homes.
- Improved Aesthetics: A thoughtfully designed extension can contribute to the overall design and appeal of your home, both inside and out.
Common Types of Rear Extensions
When considering a rear extension, homeowners generally have a variety of styles to choose from:
- Single-Storey Extensions: These are one level and often used to create spacious areas such as large kitchens or family rooms. They are popular for their balance of impact and cost-efficiency.
- Double-Storey Extensions: As the name implies, these extensions add two levels to your home, providing both ground floor and upper floor additions, which can be more costly and require more stringent planning permissions.
- Wrap-Around Extensions: Combining a rear and side extension, this design maximizes space and can produce a large, open-plan area.
- Lantern Roof Extensions: Often featuring a glass roof lantern, this type of extension creates a bright and airy atmosphere, ideal for contemporary homes.
Planning Your Rear Extension
Key Considerations Before You Start
Embarking on a home renovation journey requires careful planning. Consider the following factors:
- Space Requirements: Assess how much space you genuinely need and what function the new area will serve. This will guide the design and size of the extension.
- Budget: Determine your financial limits early on. Rear extensions can vary widely in cost, so it’s essential to establish a realistic budget that includes potential unforeseen expenses.
- Current Layout: Consider how a new extension will integrate with the existing structure. You don’t want to create a disjointed or awkwardly connected space.
- Impact on Garden: A rear extension might reduce your garden space, so evaluate how this will affect your outdoor living.
Required Permissions and Regulations
Before commencing any building work, it’s crucial to understand your legal obligations:
- Planning Permission: Most rear extensions will need planning permission, particularly if the structure exceeds specific size limits or is on designated land. Research the guidelines in your area before proceeding.
- Building Regulations: Compliance with building regulations ensures that your extension is safe and meets health and safety standards. This typically involves structural integrity, ventilation, drainage, and insulation considerations.
Visit the Rear extensions section for more details on requirements and local regulations.
Choosing the Right Design
The design of your rear extension can greatly influence its success. Factors to consider include:
- Architectural Style: The new structure should harmonize with your existing home’s aesthetics. Research styles that will complement your house, whether traditional or modern.
- Layout: Opt for an open-plan layout if you desire fluid spaces, or maintain separate rooms if defined spaces are more suited to your needs.
- Lighting: Consider how natural light will enter the new space. Features like skylights or large windows can help illuminate the extension effectively.
- Materials: Your choice of materials should be durable and environmentally friendly while also fitting the overall design and aesthetic of your home.
Design Inspirations for Rear Extensions
Modern Aesthetic Ideas
Modern extensions often utilize clean lines, large glass panels, and natural materials. Here are some design inspirations:
- Glass Doors: Bifold doors can seamlessly connect indoor and outdoor spaces, enhancing light and visibility of your garden.
- Open-Plan Living: Blending kitchen, dining, and living spaces creates an inviting atmosphere and encourages family interaction.
- Minimalistic Design: Opting for a minimalist approach with neutral colors, natural wood finishes, and simple designs can create a calming environment.
Functional Spaces: Kitchen vs. Living Room Extensions
Choosing between a kitchen or living room extension will depend on your family’s lifestyle:
- Kitchen Extensions: Ideal for those who enjoy cooking or entertaining. A larger kitchen can allow for better flow, accessibility, and even incorporate dining solutions.
- Living Room Extensions: Perfect for families needing extra space for relaxation and gatherings. An extended living area can provide comfort, especially if designed to include outdoor views.
Outside-In: Blending Indoors with Nature
Integrating natural elements into the design can enhance well-being:
- Green Roofs: Consider a green roof installation to create a natural habitat and improve insulation.
- Indoor Plant Integration: Use indoor plants strategically to connect your new space with nature and improve air quality.
- Natural Materials: Stone, wood, and other natural finishes can create a seamless transition from indoors to outdoors.
Budgeting for Rear Extensions
Cost Breakdown for Different Types of Extensions
Understanding potential costs associated with various types of rear extensions is crucial for budgeting:
- Single-Storey Extensions: Typically range from £1,200 to £2,000 per square meter, depending on materials and complexity.
- Double-Storey Extensions: These can cost between £1,500 to £2,500 per square meter, given their structural requirements.
- Wrap-Around Extensions: The cost can range widely from £1,500 to £2,650 per square meter, depending on the design complexity.
How to Avoid Overspending
Managing expenses effectively helps ensure a smooth renovation journey:
- Get Multiple Quotes: Always compare quotes from different contractors to avoid overpaying.
- Stick to the Budget: Create a clear budget and avoid making impulsive decisions that may increase costs.
- Plan for Contingencies: Set aside a contingency budget of around 10-15% for unforeseen costs.
Financing Options for Your Project
There are several financing options available for homeowners considering rear extensions:
- Home Equity Loans: If you’ve built up equity in your home, a home equity loan can provide the necessary funds.
- Personal Loans: For those without enough equity, personal loans can cover renovation costs.
- Government Grants: Research local government grants or schemes that may assist with home renovations.
Hiring Professionals for Your Rear Extension
Finding Qualified Architects and Contractors
Finding the right professionals can significantly influence the outcome of your project:
- Research Reputable Firms: Look for architects and builders with strong portfolios and customer reviews.
- Check Credentials: Ensure that potential contractors are licensed and insured.
- Interview Candidates: Ask potential professionals about their experience with similar projects and inquire about their design philosophy.
Managing the Construction Process
Effective project management is essential to ensure timely completion:
- Set Clear Timelines: Establish a timeline for the project and hold your contractors accountable.
- Regular Check-Ins: Schedule frequent site visits to monitor progress and resolve any issues promptly.
- Communicate Clearly: Maintain open communication with your contractors and other professionals throughout the process.
Ensuring Quality and Timeliness
To ensure your rear extension meets quality expectations, consider the following:
- Quality Control: Regularly review the work against your original design and specifications to ensure quality standards.
- Final Inspections: Before making final payments, do thorough walkthroughs and inspect each element of the work completed.
- Documentation: Keep detailed records of all communications, contracts, and invoices for your protection and reference.
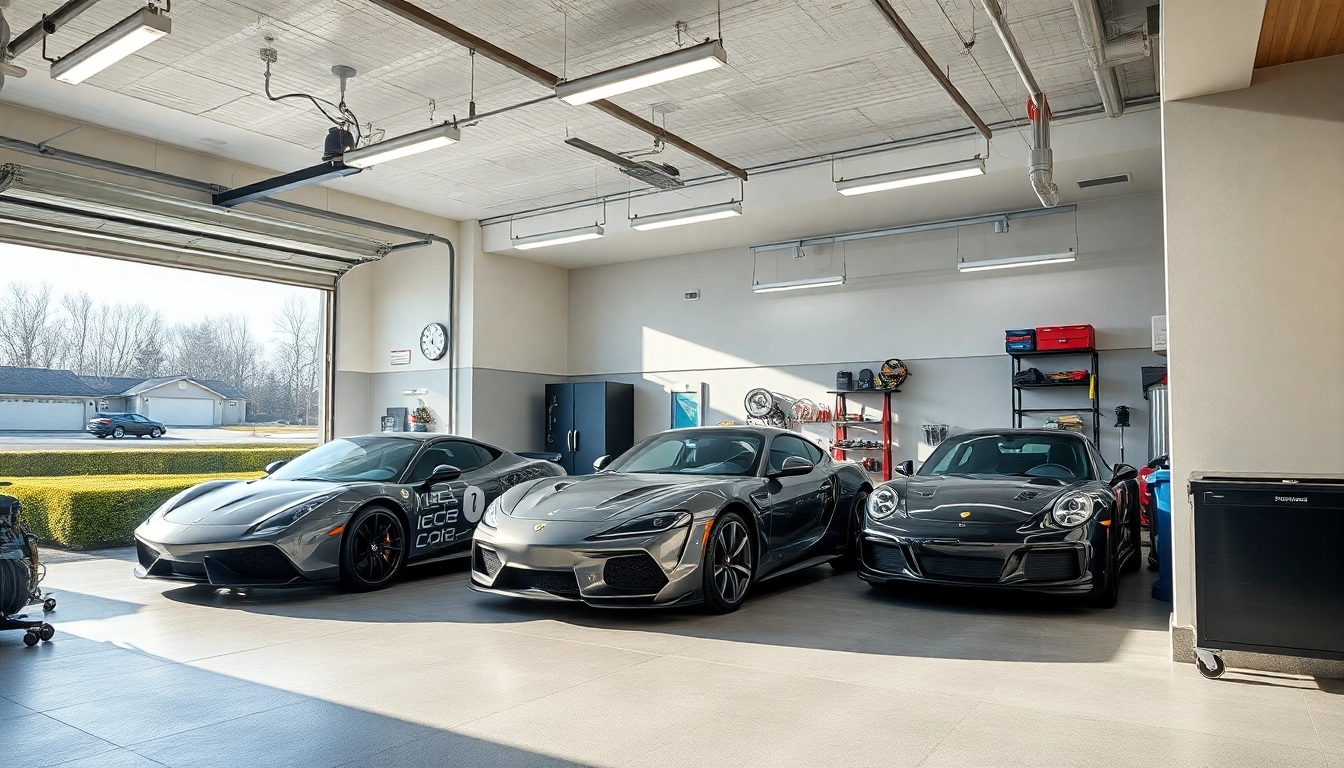
Elevate Your Space: Innovative Ideas for Custom Garages Tailored to Your Needs
Understanding Custom Garages
When we talk about enhancing the functionality and aesthetics of your property, one of the most transformative additions can be the integration of custom garages. These tailored structures are not only designed to shelter vehicles but offer a wide array of benefits that can elevate the usability of your property.
What Defines a Custom Garage?
A custom garage is a tailored space built to meet the specific needs and tastes of the homeowner. Unlike pre-fabricated or standard garages, custom garages give you the freedom to choose everything from layout and size to materials and finishes. The essence of a custom garage lies in its personalized approach, allowing homeowners to optimize the space based on their individual requirements—be it vehicle storage, workshop areas, or even recreational spaces.
Benefits of Custom Garages
- Tailored Space: Custom garages can be designed to accommodate specific vehicles, tools, or equipment, making them ideal for hobbyists, collectors, or small business owners.
- Increased Property Value: A well-designed custom garage can enhance your property’s curb appeal and overall value, making it an appealing feature for future buyers.
- Improved Functionality: Whether it’s for storage, work, or hobbies, a custom garage maximizes utility, allowing for organized and efficient use of space.
- Energy Efficiency: Many custom garages can incorporate eco-friendly materials and technologies that contribute to energy savings and reduced carbon footprints.
Common Misconceptions About Custom Garages
Despite their growing popularity, various myths surround custom garages. One prevalent misconception is that custom garages are significantly more expensive than traditional options. While it’s true that quality comes at a cost, the long-term benefits and added value can often outweigh the initial investment. Furthermore, many believe that designing a custom garage requires extensive time and complex procedures. However, with the right planning and professional guidance, the process can be smooth and time-efficient.
Design Elements of Custom Garages
Choosing the Right Layout
The layout is a critical starting point in designing a custom garage. Considerations include how many vehicles you plan to store, whether you want additional space for equipment or a workshop, and the overall flow of traffic within the garage. A well-planned design will not only maximize space but make everyday tasks easier and more efficient.
Materials and Finishes for Your Garage
Material selection is vital; it affects durability, aesthetics, and maintenance. Common materials include wood, steel, and concrete. Each has its pros and cons—for instance, wood can provide a classic look, while steel offers robustness and longevity. Choosing the right finishes, such as paint or flooring, can also contribute to the overall look and feel of your garage. Opt for finishes that are easy to clean and resistant to wear and tear.
Incorporating Technology Into Custom Garages
Today’s custom garages can integrate advanced technologies that enhance convenience and security. Smart devices such as automated door openers, security cameras, and lighting systems allow for streamlined access and monitoring. Additionally, climate control systems can maintain the ideal environment for sensitive collections or tools, making garages not just functional but also comfortable spaces to work in.
Steps to Planning Your Custom Garage
Budgeting and Cost Considerations
Budgeting for a custom garage requires careful planning. Begin by determining how much you are willing to invest and what specific features are most important to you. Keep in mind that costs can vary significantly based on materials, size, and labor. It is advisable to consult with professionals who can provide accurate estimates so that your financial projections align with the reality of building a custom garage.
Permitting and Regulations
Before construction can commence, it’s essential to understand local building codes and zoning laws that may affect your project. Many municipalities require permits, especially for structures that deviate from standard designs. Researching these regulations upfront can prevent costly delays and complications during the construction process.
Working with Professionals vs. DIY
Deciding whether to hire professionals or tackle the project yourself can significantly impact your garage’s final outcome. While DIY projects might seem cost-effective, they can lead to challenges such as improper installation or safety hazards if not executed correctly. Conversely, professionals bring expertise, ensuring that your custom garage meets safety standards and mirrors your vision accurately. Evaluating your skills, budget, and timeline will guide this decision.
Custom Garage Use Cases
Garages for Hobbyists and Collectors
Custom garages are an excellent choice for hobbyists and collectors. Whether you’re an auto enthusiast needing space for vehicles, or a craftsman looking for a workshop environment, a custom garage can be tailored to suit specific interests. Features might include ample storage for tools, dedicated workspaces, or display areas for collectibles, enhancing both functionality and enjoyment.
Functional Custom Garages for Businesses
For those running small businesses, a custom garage can serve as a practical workspace. Whether it’s for auto repair, a workshop, or storage for supplies, these garages can be designed to improve productivity. Incorporating features such as shelving, office space, and temperature control can create a professional environment conducive to business operations.
Showcase Garages for Enthusiasts
Some homeowners may wish to transform their garage into a showcase of their passions—be it vintage cars, motorcycles, or other collectibles. Showcase garages often include features like exhibition lighting, custom cabinetry, and polished floors to create an aesthetically appealing space that highlights the owner’s treasures. These garages often become points of pride and can be spaces for hosting gatherings or events.
Maximizing Your Custom Garage Investment
Maintenance Tips for Longevity
To ensure your custom garage remains functional and attractive, regular maintenance is key. This includes keeping the space clean, checking for structural integrity, and addressing any wear and tear proactively. Simple measures such as sealing floors, cleaning gutters, and regularly inspecting the roof can prolong the life of your garage, protecting your investment.
Enhancing Resale Value with a Custom Garage
Investing in a custom garage not only enhances your living space but can significantly boost your property’s resale value. Buyers often view garages as desirable features, especially if they are well-designed. When planning your custom garage, consider how features like extra storage, energy efficiency, and aesthetics can appeal to future potential buyers, further increasing your property’s marketability.
Community and Design Trends in Custom Garages
Staying updated with current design trends can help you create a custom garage that is not only functional but visually appealing. Some emerging trends include the use of sustainable materials, minimalist designs, and integrated smart home technology. Additionally, community preferences might vary; knowing what your neighbors appreciate can help tailor your garage to stand out without over-customizing it for your area.

Summer Lawn Care: Keeping Grass Green in the Heat
Summer lawn care is one of the most important aspects of maintaining a lush, healthy lawn. The hot, dry conditions that characterize summer can quickly turn your vibrant green turf into a dull, brown patch of dying grass if proper practices aren’t followed. At Best Lawn Guy, we understand that summer brings specific challenges to your yard, and that’s why mastering the art of Summer Lawn Care is essential for any homeowner who wants their lawn to thrive even in peak heat.
Why Summer Lawn Care Is Different from Other Seasons
Unlike spring or fall, where cool temperatures and ample moisture promote natural lawn growth, summer presents a hostile environment for grass. The combination of intense sun, high temperatures, and reduced rainfall can dehydrate your soil and stress your turf. Summer lawn care requires a proactive strategy focused on moisture retention, mowing adjustments, and appropriate fertilization. Without this strategic approach, your lawn will struggle to survive, let alone look beautiful.
Understanding Grass Stress During Summer Months
A critical component of effective summer lawn care is understanding how grass reacts to heat and drought. Grass becomes stressed when it cannot access enough moisture, resulting in wilting, discoloration, and stunted growth. When exposed to continuous high temperatures, even resilient grass species begin to show signs of fatigue. By observing your lawn daily and recognizing early stress symptoms, you can implement effective summer lawn care techniques before permanent damage occurs.
Watering Wisely: The Key to Summer Lawn Care
Watering is perhaps the most vital part of any summer lawn care regimen. Proper watering can mean the difference between a green lawn and a brown wasteland. Early morning is the best time to water because it reduces evaporation and allows grass blades to dry throughout the day, preventing fungal diseases. Deep, infrequent watering is preferred over shallow, frequent watering to encourage deep root development, which strengthens your lawn’s drought resistance during intense summer heat.
Mowing Strategies for Optimal Summer Lawn Care
Adjusting your mowing height is another important factor in summer lawn care. During summer, you should mow higher than usual to provide shade for grass roots and reduce water loss. Taller grass blades also help protect the soil from direct sunlight, lowering the surface temperature and promoting deeper root growth. Never remove more than one-third of the grass blade in a single mowing session, as this can further stress your lawn and hinder its resilience under summer conditions.
Fertilizing Do’s and Don’ts in Summer Lawn Care
Fertilizing during summer must be done with caution. While grass still needs nutrients to stay healthy, over-fertilizing during the hot months can burn your lawn and cause more harm than good. A slow-release, nitrogen-rich fertilizer applied in moderation will support healthy growth without overwhelming your grass. If your turf is already stressed, it’s better to focus on proper watering and mowing before applying any nutrients as part of your summer lawn care routine.
Dealing with Weeds During Summer Lawn Care
Weeds can be especially aggressive during the summer, competing with your lawn for water and nutrients. Effective summer lawn care involves consistent weed monitoring and treatment. Hand-pulling is ideal for isolated patches, but larger infestations may require herbicides that are safe for use in hot weather. Avoid using pre-emergent herbicides unless early in the season, and always water appropriately after application to avoid lawn damage.
Aeration: A Critical Component of Summer Lawn Care
Aerating your lawn during summer can significantly improve its ability to absorb water and nutrients. Compacted soil prevents root growth and encourages runoff, making it harder for your lawn to retain moisture. Core aeration relieves this compaction and should be part of your summer lawn care if your soil is particularly dense or if your lawn sees heavy foot traffic. Even occasional aeration can dramatically improve your turf’s resilience in the heat.
Choosing the Right Grass Type for Summer Lawn Care
Warm-season grasses like Bermuda, Zoysia, and St. Augustine thrive in summer conditions, while cool-season varieties like Kentucky Bluegrass may struggle without extra care. Selecting the appropriate grass type for your climate makes summer lawn care much easier. If you’re establishing a new lawn or overseeding, it’s critical to pick a grass that can handle your region’s summer conditions without excessive effort or water usage.
Mulching as a Moisture-Saving Summer Lawn Care Tip
Mulching grass clippings is a simple yet powerful summer lawn care method to conserve moisture. When you leave clippings on the lawn after mowing, they decompose quickly, returning nutrients to the soil and forming a natural barrier against evaporation. This method not only boosts soil health but also reduces the need for supplemental fertilizer and water, creating a more sustainable lawn care routine during summer.
Preventing and Managing Lawn Pests in Summer
Hot weather is ideal for the development of lawn pests such as grubs, chinch bugs, and armyworms. Effective summer lawn care includes regular inspection for pest damage and proactive management. If you notice irregular brown patches or wilting grass despite proper watering, it’s time to investigate for pests. Treat infestations early using lawn-safe insecticides or natural biological controls to prevent widespread damage.
Dealing with Drought and Water Restrictions
In areas where water restrictions are enforced during dry months, summer lawn care becomes a balancing act. Prioritize deep watering sessions on allowed days, and focus on soil improvement with compost and mulch to retain available moisture. Consider drought-tolerant grass varieties and adjust your expectations. A slightly dormant lawn is not dead—it’s conserving energy and will recover when favorable conditions return.
Overcoming Heatwaves with Smart Summer Lawn Care
When extreme heatwaves strike, your summer lawn care strategy must shift into high gear. Stop mowing entirely if temperatures exceed 90°F for prolonged periods. Water deeply during cool hours and minimize foot traffic on the lawn. Apply organic soil amendments to improve resilience and structure. Remember, heat stress is temporary, and thoughtful summer lawn care ensures your turf will bounce back when temperatures normalize.
Seasonal Timing Matters in Summer Lawn Care
Timing is everything when it comes to summer lawn care. From applying fertilizers and herbicides to watering schedules and mowing frequency, aligning each action with the right phase of the season makes a significant difference. Early summer is ideal for strengthening your lawn in preparation for the hottest weeks ahead, while late summer is a good time to begin planning for fall lawn recovery and overseeding if needed.
Soil Health: The Foundation of Summer Lawn Care
Healthy soil is the cornerstone of any successful summer lawn care plan. Soil testing can help identify pH imbalances, nutrient deficiencies, or drainage issues that may be limiting your lawn’s performance. Amending your soil with organic matter or lime based on test results ensures optimal conditions for root growth and water retention. Without healthy soil, even the best lawn care practices won’t yield long-lasting results.
Composting and Organic Treatments for Summer Lawn Care
Incorporating compost into your summer lawn care routine provides a slow-release source of nutrients and organic matter. Compost improves soil texture, increases microbial activity, and enhances your lawn’s ability to retain water. It’s especially helpful during dry spells when synthetic fertilizers might damage grass. Top-dressing with compost once or twice during summer supports both root health and visual appeal.
Reseeding Bare Spots as Part of Summer Lawn Care
Bare patches can become more noticeable in summer due to stress and wear. Spot-seeding these areas is an important summer lawn care step. Choose a seed mix suited to your grass type and climate, and keep the area moist until establishment. Avoid seeding during heatwaves, and focus on early morning or late evening watering to support germination without excess evaporation.
Lawn Equipment Maintenance to Support Summer Lawn Care
Your equipment plays a supporting role in your summer lawn care success. Dull mower blades tear grass instead of cutting it cleanly, leading to brown tips and increased water loss. Sharpen blades regularly, clean your mower deck, and inspect irrigation systems for leaks or uneven coverage. Well-maintained tools ensure every aspect of your summer lawn care is carried out efficiently and effectively.
Using Shade Strategically in Summer Lawn Care
Strategic use of shade is often overlooked in summer lawn care, but it can make a big difference in lawn appearance and water retention. Planting shade trees or using shade cloth in high-exposure areas reduces heat stress. Be mindful, however, that too much shade can hinder grass growth, so finding the right balance is key to a lawn that stays green without sacrificing density.
Long-Term Benefits of Consistent Summer Lawn Care
Investing time and effort into summer lawn care has long-term payoffs. A lawn that is well-cared for during the summer will recover faster in the fall, require fewer repairs, and maintain higher resistance to pests, weeds, and diseases year-round. Consistent care builds strong root systems and resilient turf that can handle anything the seasons throw at it.
Summer Lawn Care and Your Home’s Curb Appeal
A vibrant, green lawn during the peak of summer heat is not only a source of pride but also adds significant curb appeal to your home. Neighbors, potential buyers, and guests will all take note of a well-maintained lawn. When you follow a reliable summer lawn care routine, you’re not just nurturing grass—you’re increasing the aesthetic and financial value of your property.
Conclusion
Mastering summer lawn care is about more than just mowing and watering—it’s about understanding your grass, your soil, and the unique conditions that summer brings. From proper irrigation and mowing techniques to strategic fertilization and pest control, every detail counts. By committing to a consistent and thoughtful summer lawn care regimen, you can keep your grass green, healthy, and beautiful throughout even the most challenging summer conditions.
FAQs
1. How often should I water my lawn during the summer?
For effective summer lawn care, water your lawn deeply 2–3 times a week early in the morning to encourage deep root growth and minimize evaporation.
2. Can I fertilize my lawn in the middle of summer?
Yes, but do so cautiously. Use slow-release fertilizer in moderation and avoid fertilizing when temperatures are above 85°F to prevent lawn burn.
3. What’s the ideal mowing height for summer lawn care?
Raise your mower blade to about 3–4 inches during summer to provide shade to the soil, retain moisture, and protect grass roots from heat.
4. How do I prevent my lawn from turning brown in extreme heat?
Implement a consistent summer lawn care plan that includes deep watering, mulching, reduced mowing frequency, and limiting foot traffic during heatwaves.
5. Is it okay to aerate during summer?
Aeration can be part of summer lawn care, especially if your lawn is compacted. However, it’s best done early in summer or with caution to avoid additional stress.
Contact Us
- Phone: 651-994-8855
- Location: P O Box 534 Rosemount, MN 55068
- Website: bestlawnguymn.com
- Instagram: https://www.instagram.com/bestlawnguymn/
- Facebook: https://www.facebook.com/bestlawnguymn/

Enhance Your Space with Versatile Movable Glass Partitions for Modern Interiors
Understanding Movable Glass Partitions
What Are Movable Glass Partitions?
Movable glass partitions are versatile architectural elements that allow space to be reconfigured based on various needs, providing both functionality and aesthetic appeal. Unlike traditional fixed walls, these partitions can be opened, closed, or rearranged to adapt to different usage scenarios within a space. They are primarily constructed from tempered glass, ensuring strength and safety while offering transparency that enhances the flow of natural light, creating a more open environment.
Movable glass partitions are ideal for a variety of settings, allowing users to fluidly adjust room sizes and functionalities, be it for office layouts, exhibition areas, or hospitality environments. These systems can effortlessly segment large rooms into smaller, intimate spaces and vice versa, thus promoting flexibility in architectural design.
Benefits of Using Glass Partitions in Your Space
- Enhanced Aesthetics: Movable glass partitions create a sleek and modern look, contributing to a contemporary design that is appealing in corporate, retail, and hospitality spaces.
- Improved Natural Light: The transparency of glass allows for increased natural light flow, which can promote well-being and productivity in workspaces.
- Acoustic Control: Many movable glass partitions are designed with soundproofing in mind, effectively reducing noise disruptions in open environments.
- Space Flexibility: They allow for dynamic use of space, enabling you to adjust the size and functionality of rooms according to specific requirements or events.
- Easy Maintenance: Glass surfaces are relatively easy to maintain, primarily requiring standard cleaning protocols to keep them looking clear and efficient.
Key Features to Look For
When selecting movable glass partitions, certain features can enhance their performance and user experience:
- Installation Type: Consider whether you prefer framed or frameless systems based on design preferences and space aesthetics.
- Sound Insulation Rating: Look for partitions with a high sound transmission class (STC) rating if noise control is a priority.
- Glass Thickness: Thicker glass panels typically provide better durability and sound insulation.
- Operation Mechanism: Assess the operation modes—manual or automated systems can drastically affect user experience and flexibility.
- Custom Design Options: Customizable options like colors, textures, and finishes allow for greater personalization to fit the overall design of the space.
Applications of Movable Glass Partitions
Corporate Offices: Redefining Workspaces
In the corporate world, the design of workspaces is rapidly evolving to promote collaboration and flexibility. Movable glass partitions play a pivotal role in this transformation by allowing companies to easily alter office layouts as team sizes change or project needs arise. For instance, an organization can shift from an open-plan layout to a more secluded workspace simply by adjusting the glass partitions, fostering both teamwork and privacy.
Additionally, integrating movable glass partitions can also enhance aesthetics, creating a more appealing atmosphere that attracts top talent. By using glass partitions, companies can reflect a culture of transparency and openness and create inspiring environments that enhance employee morale and productivity.
Retail Spaces: Enhancing Customer Experience
Movable glass partitions are equally invaluable in retail settings. They allow stores to create dynamic product displays and optimize customer flow without the need for permanent structural changes. Retailers can easily segment areas for promotions, seasonal changes, or special events, making it easy to showcase new merchandise effectively.
Furthermore, glass partitions enhance customer engagement by providing clear visibility into different sections of the store while maintaining an open atmosphere. Retailers can leverage this openness to create experiential areas, drawing in customers and encouraging exploration.
Hospitality: Flexibility and Elegance
The hospitality industry has embraced movable glass partitions to elevate guest experiences and operational efficiency. Hotels, restaurants, and event spaces utilize these partitions to create versatile environments that can accommodate both large gatherings and intimate settings. By reconfiguring spaces with movable glass partitions, venues can easily adapt to unexpected demand, such as large groups booking a last-minute event.
Additionally, these partitions ensure that areas remain visually appealing and inviting, contributing to an elegant and sophisticated atmosphere that enhances the overall guest experience. Guests appreciate the open yet defined spaces, and this flexibility can lead to increased customer satisfaction and return visits.
Installation and Maintenance of Movable Glass Partitions
Planning for Installation: Best Practices
Successfully installing movable glass partitions requires careful planning and consideration of several factors:
- Measurements: Accurate measurements are crucial; consult with professionals to ensure that the partitions fit the intended space without obstructing essential elements such as doors or windows.
- Regulatory Compliance: Ensure that your installation meets local building codes, including safety and accessibility regulations.
- Professional Help: Hiring experienced installers can save time and prevent costly mistakes, ensuring that the system functions smoothly.
- Future-proofing: Consider future space needs and how the partitions can be integrated or reconfigured as requirements change over time.
Regular Maintenance Tips for Longevity
To prolong the life and performance of movable glass partitions, routine maintenance is essential. Here are some effective tips:
- Cleaning: Use appropriate cleaning agents for glass to remove smudges and fingerprints while avoiding harsh chemicals that could damage the surfaces.
- Routine Inspections: Regularly check the mechanical operations of the partitions, including tracks and locking mechanisms, to prevent operational issues.
- Addressing Damage Promptly: Any scratches or chips should be addressed immediately to avoid further deterioration and ensure safety.
Common Installation Challenges and Solutions
While installing movable glass partitions, several challenges may arise:
- Weight Considerations: Glass can be heavy; ensure that the supporting structures can withstand the load. Utilize reinforced structures or frameworks as needed.
- Alignment Issues: If not properly aligned, partitions can become dysfunctional. Double-check measurements and ensure precise installation techniques.
- Environmental Changes: Changes in humidity and temperature can affect glass performance. Choosing high-quality materials designed to withstand environmental fluctuations can mitigate these issues.
Comparing Different Types of Movable Glass Partitions
Framed vs. Frameless Glass Systems
Movable glass partitions can typically be categorized into two main types: framed and frameless. Framed partitions have a metal or wooden framework that supports the glass panels, offering a more traditional look and providing enhanced structural integrity—ideal for high-traffic areas where durability is a concern. On the other hand, frameless systems provide a minimalist aesthetic, allowing for clear sightlines and maximizing light flow, making them popular in modern design settings. The choice between these two options often depends on aesthetic preference, functional requirements, and budget constraints.
Operable Walls vs. Fixed Partitions
Operable walls are designed to be movable, allowing for dynamic space management. These are often used in environments where space utilization is imperative, such as auditoriums or studios. Fixed partitions, conversely, are permanent installations that provide structural divisions without the flexibility of movement. Choosing the right type often hinges on specific needs—consider the frequency and necessity of space adjustments in your planning process.
Soundproofing and Privacy Features
For environments where sound control is vital, such as offices or conference areas, selecting glass partitions with soundproofing capabilities is essential. Look for systems that feature specialized acoustic glass and sound-dampening seals to bolster privacy and minimize noise transmission. This is particularly important in high-density environments where confidentiality and focus are paramount.
Case Studies: Successful Implementations of Movable Glass Partitions
Corporate Case Study: Transforming Team Dynamics
In a well-known tech firm, the introduction of movable glass partitions transformed an outdated office layout into a more dynamic workspace. Employees could easily collaborate in multifunctional pods or retreat into more private areas for focused work. This flexibility resulted in a reported 30% boost in productivity and significantly enhanced employee satisfaction.
Retail Case Study: Boosting Sales through Design
A high-end fashion retailer in a bustling urban shopping district leveraged movable glass partitions to create seasonal displays and thematic shopping experiences. By dynamically changing the layout based on promotional needs, the retailer saw a 25% increase in foot traffic and a corresponding rise in sales, demonstrating the direct impact of effective space design on retail performance.
Hospitality Case Study: Creating Versatile Venues
At a luxury hotel, movable glass partitions were installed in event spaces to allow for reconfiguration based on the type of event—ranging from weddings to corporate meetings. The ability to quickly adapt to guests’ needs resulted in a 40% increase in event bookings, exemplifying how innovative space design can lead to significant operational success in hospitality.

Enhance Your Space with Stylish Movable Glass Partitions for Versatile Environments
Understanding Movable Glass Partitions
What Are Movable Glass Partitions?
Movable glass partitions are modern architectural solutions designed to create flexible spaces by allowing for the reconfiguration of room layouts with ease. These partitions facilitate the division of areas without the need for permanent walls, empowering designers and architects to maximize the functionality of commercial, residential, and event spaces. By incorporating panels that can be opened and closed on demand, movable glass partitions provide an innovative means of enhancing connectivity while also promoting an open atmosphere adorned with natural light. A prime showcase of this technology can be seen in movable glass partitions, which efficiently transform environments with their sleek design and superior functionality.
Benefits of Using Movable Glass Partitions
The benefits of implementing movable glass partitions into various spaces extend beyond aesthetics. Below are some of the primary advantages:
- Flexibility: These partitions can be easily moved or retracted to change room size, accommodating a variety of activities and preferences.
- Natural Light: Made primarily of glass, these partitions allow maximum daylight to permeate the area, reducing the reliance on artificial lighting and creating a more inviting atmosphere.
- Sound Control: With advanced technology, some movable glass partitions can provide excellent sound isolation, making them ideal for conference rooms or dining areas in restaurants.
- Design Versatility: Available in various styles and finishes, movable glass partitions can be tailored to complement any architectural or design theme.
- Cost-Effectiveness: In the long term, these partitions can reduce renovation costs by allowing reconfiguration of spaces without the need for extensive construction work.
Key Features to Look For
When selecting movable glass partitions, consider the following key features:
- Material Quality: Opt for high-quality tempered or laminated glass that offers durability while maintaining clarity and safety.
- Framework Options: The robustness of the framework is essential for functionality; look for materials that provide strength without compromising aesthetics, like aluminum or steel.
- Acoustic Properties: Depending on the intended use, investigate options with sound insulating properties to ensure privacy during meetings or events.
- Easiness of Operation: Choose systems that are user-friendly, whether they operate on tracks or feature folding mechanisms, to provide seamless transitions.
- Customization: The ability to customize the design and finish to match existing decor can enhance the overall aesthetic appeal of a space.
Applications of Movable Glass Partitions
Commercial Spaces: Maximizing Functionality
In commercial settings, movable glass partitions are invaluable for enhancing functionality and productivity. They enable companies to create multipurpose environments where individual offices can transform into shared workspaces, conference rooms can expand for larger meetings, and customer-facing areas can adapt to accommodate foot traffic fluctuations. For example, in a corporate office, a movable glass wall can separate a breakout area from the main office, allowing for both collaborative discussions and quiet work zones as needed. Many organizations, particularly in sectors like tech and consulting, have successfully integrated these partitions to foster a dynamic work culture.
Residential Uses: Creating Flexible Living Areas
Homeowners increasingly appreciate the flexibility and aesthetic appeal that movable glass partitions provide. They can convert open-concept living rooms into intimate dining areas or separate playrooms from living spaces without the need for permanent walls. In urban settings where space is at a premium, movable glass partitions facilitate living arrangements that adapt to changing family needs or gatherings, allowing for versatile home environments that reflect modern lifestyles. By employing customizable solutions, individuals can integrate these partitions into their home design seamlessly.
Event Spaces: Transforming Environments
Event planners benefit significantly from the adaptability that movable glass partitions offer. Whether for corporate functions, weddings, or exhibitions, these partitions can create unique layouts quickly, allowing spaces to evolve to suit specific purposes. They can be used to form break-out rooms for workshops or to create visually dynamic attractions at trade shows. Enhancing them with branding or thematic decorations can also elevate an event’s ambiance. Thus, the use of movable glass partitions can enhance not only the functionality of event spaces but also contribute to captivating aesthetics.
Installation and Maintenance
Steps for Effective Installation
Proper installation is crucial to the performance and longevity of movable glass partitions. The following steps outline the key phases of the installation process:
- Site Assessment: Evaluate the installation area to determine space constraints, necessary hardware, and any structural modifications.
- Preparation: Ensure the floor and wall surfaces are level and clean. Sometimes, reinforcing structures might be necessary for heavier systems.
- Install Track Systems: Begin with the installation of tracks that support the moving elements of the partitions. These must be securely anchored to walls or ceilings, depending on design.
- Hang Panels: Carefully hang the glass panels onto the track systems, ensuring they are correctly aligned and secure.
- Adjust Hardware: Fine-tune the sliding mechanisms to guarantee smooth operation for all panels. Test functionality before finalizing installation.
- Final Inspection: Conduct a walkthrough to ensure all systems function as intended and make necessary adjustments.
Regular Maintenance Best Practices
Maintaining movable glass partitions is vital to ensure their longevity and optimal performance. Here are some essential maintenance strategies:
- Cleaning: Regularly clean the glass surfaces with appropriate cleaners to avoid scratches and maintain clarity. Avoid using abrasive materials that can damage the surface.
- Inspect Moving Parts: Frequently check the tracks and rollers for any signs of debris or wear. Lubricate moving parts as recommended by the manufacturer to ensure smooth operation.
- Check Seals: Inspect the seals between glass panels periodically for wear and replace them to maintain acoustic and thermal properties.
- Adjust Mechanisms: After periods of heavy use, re-evaluate the alignment or tension of mechanical components to ensure they remain in optimal condition.
Common Issues and Troubleshooting
Despite their modern design, users may encounter some common issues with movable glass partitions. Here are tips for troubleshooting:
- Sticking Panels: If panels do not move smoothly, debris may be blocking the track or the track alignment may have shifted. Thorough cleaning and adjustment can often resolve this.
- Noise During Operation: Excessive noise can stem from wear on rollers or tracks. Applying lubricant or replacing worn components may be necessary.
- Glass Damage: In case of cracks or chips, immediate evaluation is required, and it is advisable to consult professionals for repairs or replacement.
Design Considerations for Movable Glass Partitions
Choosing the Right Style and Finish
When designing spaces with movable glass partitions, the choice of style and finish significantly impacts the overall aesthetic. Options may include frameless designs for a sleek, minimal look, or framed variations for enhanced durability and variety in finishes. Colors and textures can be customized to align with your overall design themes, ensuring that the partitions meld seamlessly into the environment.
Integrating with Existing Décor
For existing spaces, integrating movable glass partitions can be a challenge. However, thoughtful planning ensures coherence with established décor. Using consistent finishes and aligning design elements, such as door handles and trims, with existing furnishings can create a unified appearance. Additionally, think about how light interacts with the glass and materials in your space to maintain a harmonious design.
Innovative Designs and Custom Options
Contemporary designs often push the boundaries of traditional glass partitions. Customized solutions feature varying thicknesses of glass, unique geometric patterns, or even printed graphics on the glass surfaces. These bespoke options allow businesses and homeowners to express unique branding and personal style in their spaces. Innovations such as switchable privacy glass, which transitions between transparent and opaque, can also provide functionality and privacy when required.
Future Trends in Movable Glass Partitions
Smart Glass Technology
The rise of smart technology brings exciting developments to movable glass partitions. Smart glass can adjust its opacity using electrical signals, allowing users to switch from transparent to frosted states based on privacy needs. This innovation serves the dual purpose of providing light while offering discretion without the need for physical barriers. Integrating such technology could redefine workspace dynamics and personal environments, offering greater control over light and space flexibility.
Sustainable Materials and Practices
As sustainability continues to gain traction across industries, the manufacturing processes for glass partitions evolve as well. Using eco-friendly glass, like recycled or low-emission materials, promotes corporate responsibility and adherence to environmental standards. Additionally, energy-efficient designs and installation practices contribute to lower energy consumption, aligning with the growing demand for sustainable solutions in construction.
The Role of Design in Workspaces
As work cultures shift towards greater collaboration, the architectural landscape also responds. Movable glass partitions are becoming essential to modern workplace design, promoting environments that foster communication while allowing for personal spaces. Designers increasingly prioritize balanced layouts that facilitate interaction among team members and encourage a sense of community within large corporate settings. Future workspaces equipped with movable partitions will likely focus on flexibility, adaptability, and employee well-being.

Enhance Your Home Ambiance with a Stylish Water Vapor Electric Fireplace
What is a Water Vapor Electric Fireplace?
A water vapor electric fireplace is a cutting-edge alternative to traditional wood and gas fireplaces, offering an innovative and environmentally friendly way to enjoy the ambiance of a fire. Unlike traditional fireplaces that burn fuel and produce actual flames, a water vapor fireplace uses ultrasonic technology to create a visually stunning, lifelike flame effect while emitting virtually no heat. This makes them ideal for year-round use, providing aesthetic pleasure without the associated risks or heat typically characterizing fire appliances. Not only does this technology allow for a realistic flame illusion, but it also enhances indoor air quality, making it a popular choice for modern homes. For more detailed specifications, check out our comprehensive guide on water vapor electric fireplaces.
Understanding the Technology Behind Water Vapor Fireplaces
The mechanism of a water vapor fireplace is based on the process of ultrasonic vaporization. This technology utilizes high-frequency sound waves to agitate water, creating a fine mist that mimics the look of flames. The result is a mesmerizing, dancing flame effect that can add warmth to any room without the associated dangers of traditional fireplaces. Some models even integrate LED lights that enhance the realism of the flames by changing colors and intensities, giving users the flexibility to customize their fireplace experience. Additionally, because these fireplaces do not generate real fire, they remain cool to the touch, making them a safe option for families with small children and pets.
Key Benefits of Water Vapor Electric Fireplaces
Water vapor electric fireplaces offer several advantages that set them apart from traditional fireplaces:
- Safety: As they do not produce actual flames or heat, water vapor fireplaces are much safer, reducing the risk of burns or house fires.
- Environmental Impact: These fireplaces do not release harmful emissions or pollutants into the air, contributing to a cleaner, healthier indoor environment.
- Flexibility: Water vapor fireplaces can be installed virtually anywhere, as they do not require a chimney or venting system. This opens up design possibilities not available with traditional fireplaces.
- Year-Round Ambiance: They provide a cozy fire-like atmosphere without the heat, making them perfect for warmer months when you want to enjoy a fire without overheating the room.
- Low Maintenance: Water vapor fireplaces are easier to maintain compared to their traditional counterparts, with less soot and ash to clean up.
Comparing Water Vapor vs. Traditional Fireplaces
When evaluating the differences between water vapor and traditional fireplaces, several key factors come into play:
- Heat Production: Traditional fireplaces generate significant heat, suitable for warming spaces in winter, while water vapor fireplaces create an ambiance without additional warmth.
- Installation Requirements: Traditional wood or gas fireplaces require extensive installation that often includes chimneys and flue systems. In contrast, water vapor fireplaces only need a power outlet.
- Operational Costs: Water vapor fireplaces typically have lower operational costs since they don’t require fuel purchases like wood logs or gas reserves.
- Emissions: Traditional fireplaces can emit harmful particulate matter, while water vapor models are eco-friendly and promote better air quality.
Top Features to Look for in Water Vapor Electric Fireplaces
Flame Realism and Safety Features
One of the standout features of water vapor fireplaces is their incredible realism. Look for models that feature:
- Adjustable Flame Settings: Many fireplaces allow you to customize flame height and intensity, enhancing the illusion of a real fire.
- Multi-Color LED Options: The ability to switch flame colors—from orange to blue and everything in between—adds a unique touch to your decor.
- Safety Shutoff Systems: Having features that automatically turn off the unit when water levels are low or when the unit overheats is crucial for safety and longevity.
Energy Efficiency and Operation Costs
Energy efficiency is a significant factor in selecting a water vapor electric fireplace. Key considerations include:
- Power Consumption: Look for models with energy-efficient ratings that minimize electricity usage while still delivering impressive visual effects.
- Operational Costs: Calculate your typical electricity costs against the benefits of reduced heat loss in winter. Water vapor fireplaces are known for their cost-effectiveness over time.
Design Options and Customization
Water vapor fireplaces come in various designs, catering to diverse aesthetic preferences. Consider the following:
- Wall-Mounted Units: Save space and add a sleek touch to your home with wall-mounted designs.
- Freestanding Models: Offering versatility and mobility, these are perfect for changing the ambiance of any room.
- Custom Inserts: Integrate water vapor technology into existing fireplaces for a modern update.
Installing Your Water Vapor Electric Fireplace
Preparation and Installation Steps
Installing a water vapor electric fireplace is generally straightforward, requiring minimal tools and expertise. Follow these steps:
- Choose a Suitable Location: Look for a spot with access to an electrical outlet and a position where the fireplace can be enjoyed optimally.
- Measure Space Accurately: Ensure the chosen model fits the intended space without overcrowding.
- Assemble the Unit: Follow manufacturer instructions throughout the assembly process, ensuring all components are correctly attached.
- Fill the Water Tank: Fill it with distilled water as recommended to prevent mineral buildup.
- Plug It In: Connect the unit to a power source and verify that all settings function correctly before regular use.
Maintenance Tips for Longevity
To ensure your water vapor fireplace operates efficiently and lasts for years, consider these maintenance tips:
- Regularly Check Water Levels: Monitor and refill the water tank as necessary, ensuring consistent performance.
- Clean the Unit: Dust and wipe down the exterior regularly and clean the interior components as directed by the manufacturer.
- Service When Necessary: Consult the user manual for recommended servicing intervals to keep your electric fireplace functioning optimally.
Common Installation Mistakes to Avoid
While installation is typically simple, several common mistakes can occur. Avoid these pitfalls:
- Ignoring Clearance Recommendations: Ensure there’s ample clearance around the unit to prevent overheating issues.
- Placing in Direct Sunlight: This can affect the visual effects and lead to faster evaporation of water.
- Overlooking Power Needs: Using an extension cord is not recommended; ensure a dedicated outlet is available for safe operation.
Popular Water Vapor Electric Fireplace Models
Reviews of the Top Models in 2023
As the market for water vapor electric fireplaces grows, several models stand out for their features, performance, and aesthetics. Some of the top 2023 models include:
- Aquafire® Models: Known for their advanced technology and safety features, these units blend seamlessly with modern decor.
- Dimplex Opti-Myst: Renowned for their realistic flame illusion, they utilize patented technology to enhance the ambiance.
- Sunlitup 31.6-inch Water Vapor Fireplace: A great budget option with impressive features including smart water systems and customizable flame effects.
Where to Buy Affordable Water Vapor Fireplaces
Purchasing a water vapor fireplace can be done through various channels to secure competitive pricing:
- Online Retailers: Websites like Amazon, Wayfair, and dedicated home improvement sites often offer seasonal promotions.
- Manufacturer Direct Sales: Buying directly from brands like Aquafire or Dimplex can sometimes yield better pricing and warranty options.
- Local Appliance Stores: Visiting retailers can allow you to see the fireplace in person and ask questions directly.
Customer Testimonials and Experiences
Below are some shared experiences from users who have integrated water vapor fireplaces into their homes:
“I love my new water vapor fireplace! It is incredibly realistic, and I can enjoy it year-round without the heat. It’s a perfect addition to our living room.” – Sarah M.
“Installation was a breeze, and the ambiance it brings is unmatched. It was the perfect solution for our small apartment.” – James L.
Frequently Asked Questions About Water Vapor Electric Fireplaces
Are Water Vapor Fireplaces Safe for Homes?
Yes, water vapor fireplaces are designed with safety in mind. They use water to create the flame effect, eliminating the risk of fire hazards and burns associated with traditional fireplaces. Furthermore, many models encompass safety features like automatic shutoff systems to enhance user safety.
Do Water Vapor Fireplaces Produce Heat?
Water vapor fireplaces do not produce significant heat, as they are primarily designed for aesthetics rather than function as a primary heating source. However, some models may generate slight heat from the electrical components.
What Makes Water Vapor Fireplaces Eco-Friendly?
Water vapor fireplaces are eco-friendly as they do not burn fossil fuels and release harmful emissions into the atmosphere. They contribute to a healthier indoor environment while providing an appealing flame effect to enhance home aesthetics.